

Photoshop gives you full manual control over a face swap, so you can blend two photos into a single, realistic, professional result. This guide covers two proven methods for face swap in Photoshop: swapping faces with Layer Masks and swapping faces with object Selection.
You will also learn how to match skin tones and lighting so the blend looks natural.
How to Face Swap in Photoshop?
For face swap in Photoshop, Layer Masks work best when your two photos are similar in size and angle. Object Selection works better when the photos differ more. Pick the method that best fits your image, then blend and color-correct for a realistic finish.

Method 1: Face Swap With Layer Masks
**Step 1: **Upload both source and target photos into Photoshop. Place the photo with the new face on the bottom layer and your main photo on the top layer.
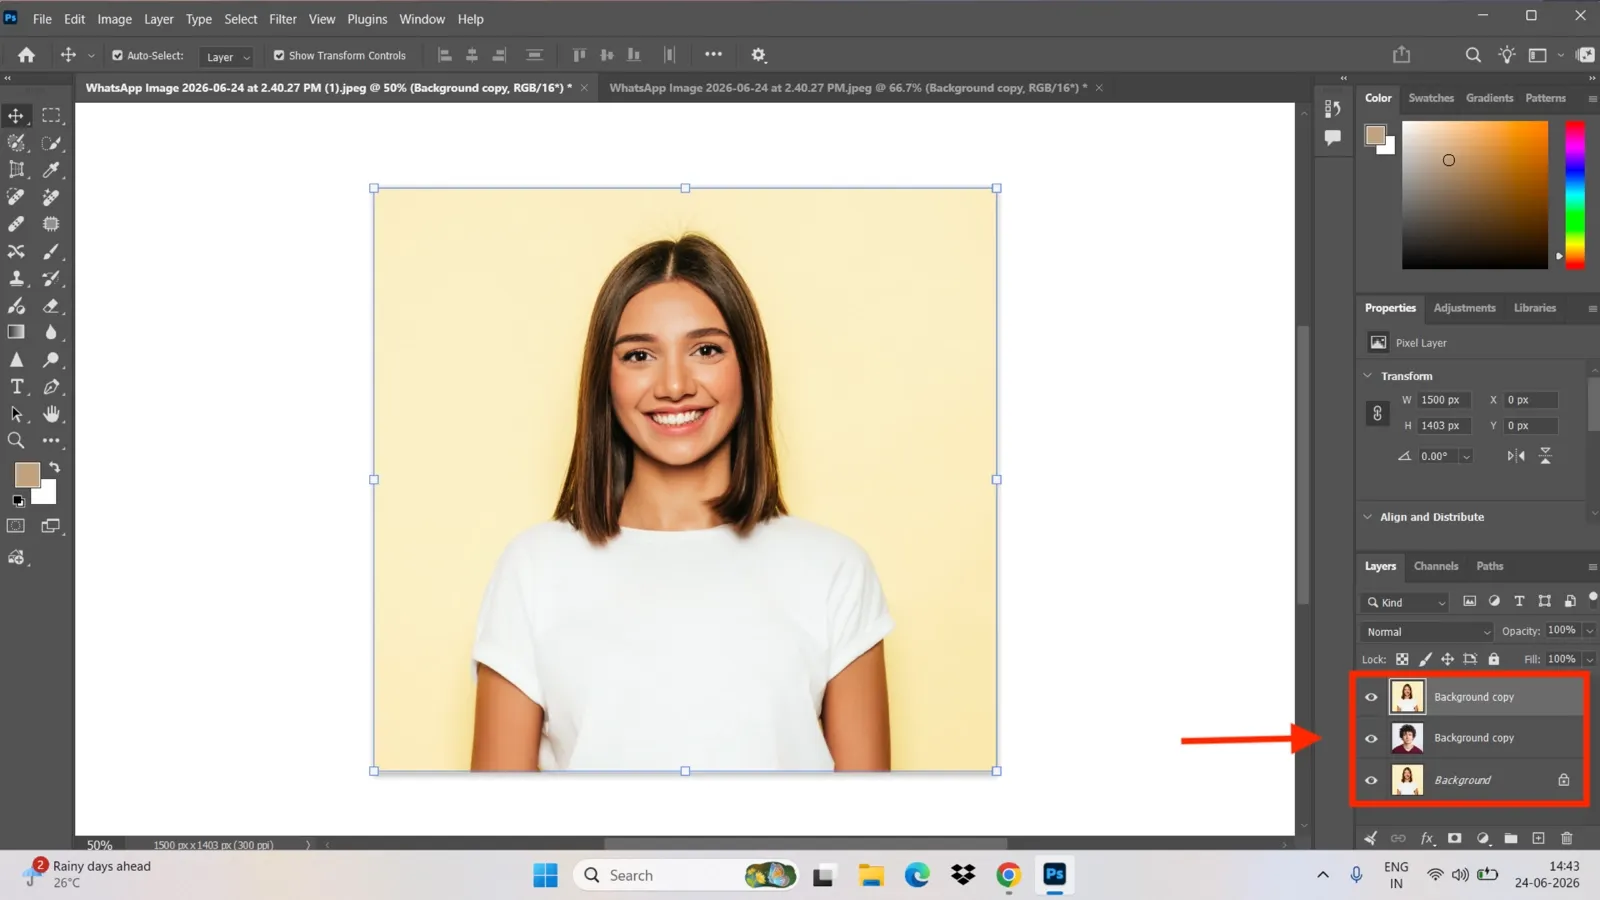
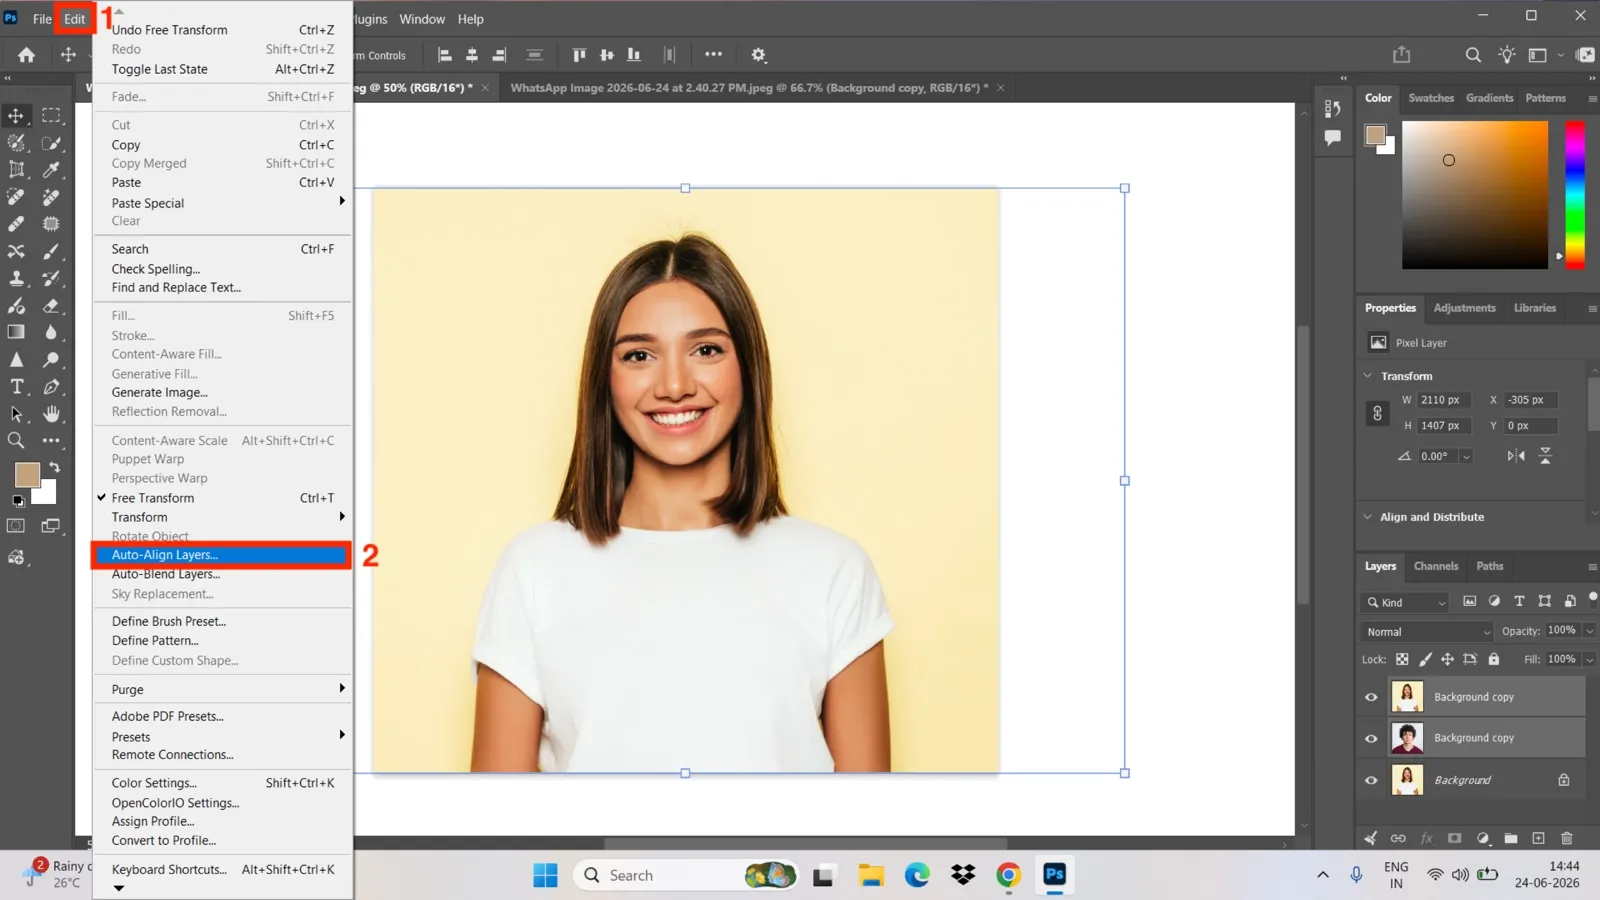
**Step 2: **Select both layers, then go to Edit > AutoAlign Layers. Photoshop automatically aligns the two faces.
**Step 3: **Click the top layer, then add a layer mask. Set its opacity to 100% so you can paint with full strength.
**Step 4: **Choose a soft brush and set its opacity to 30-50%. A softer edge blends more naturally into the layer below.
**Step 5: **Set your foreground color to black, then paint over the face on the layer mask. The face on the layer below shows through wherever you paint.
Method 2: Face Swap With Object Selection
**Step 1: **Use the photo with the face you want to copy.
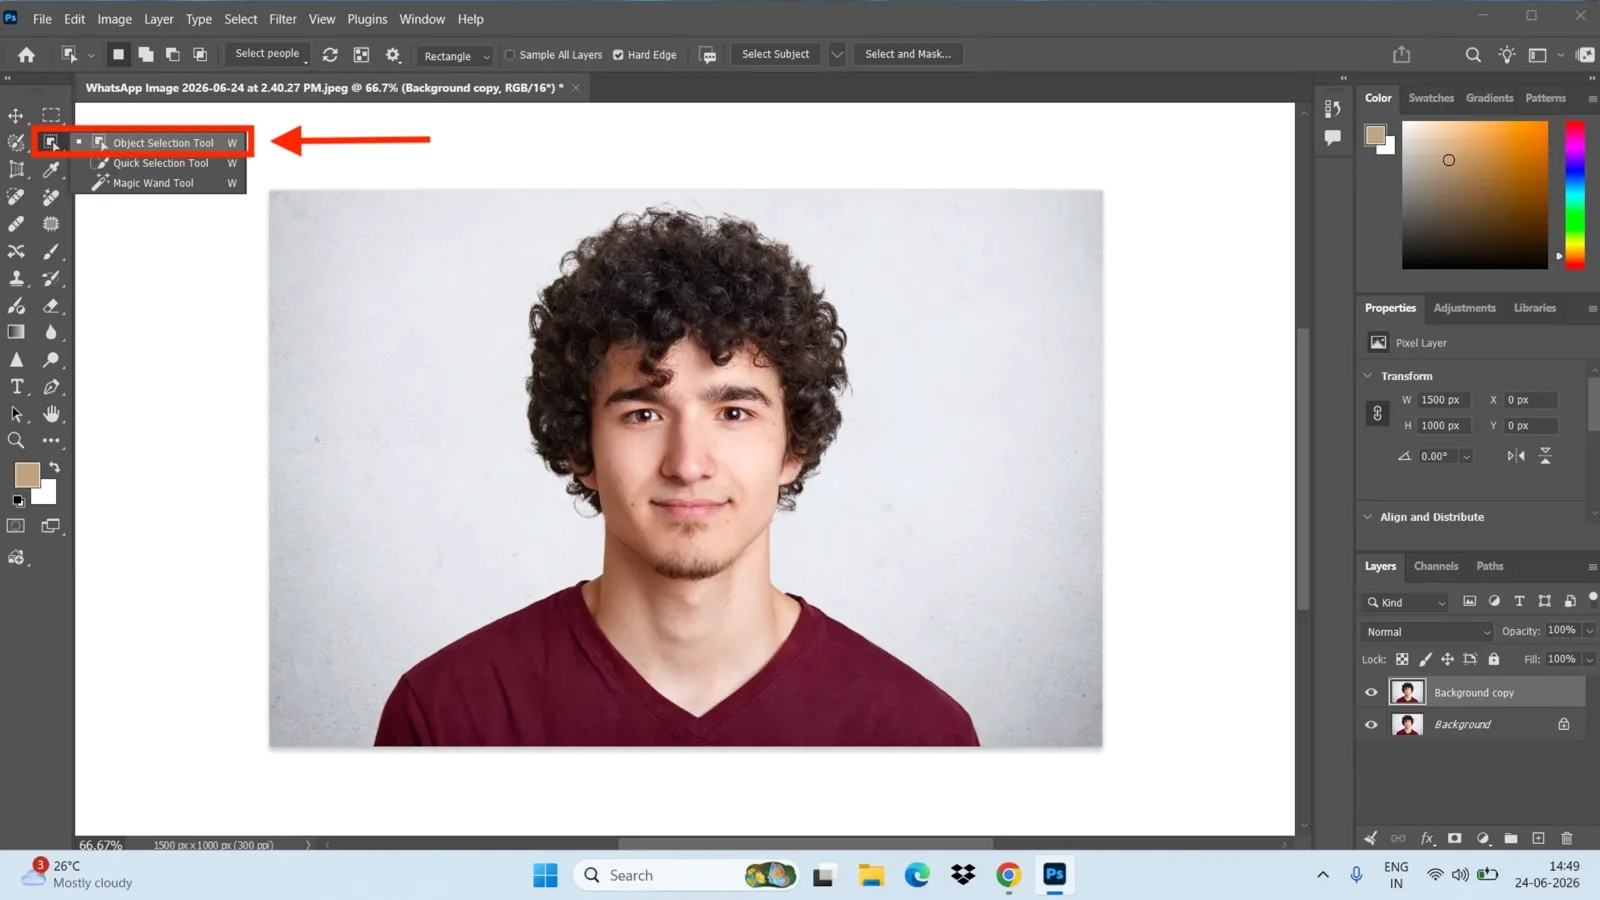
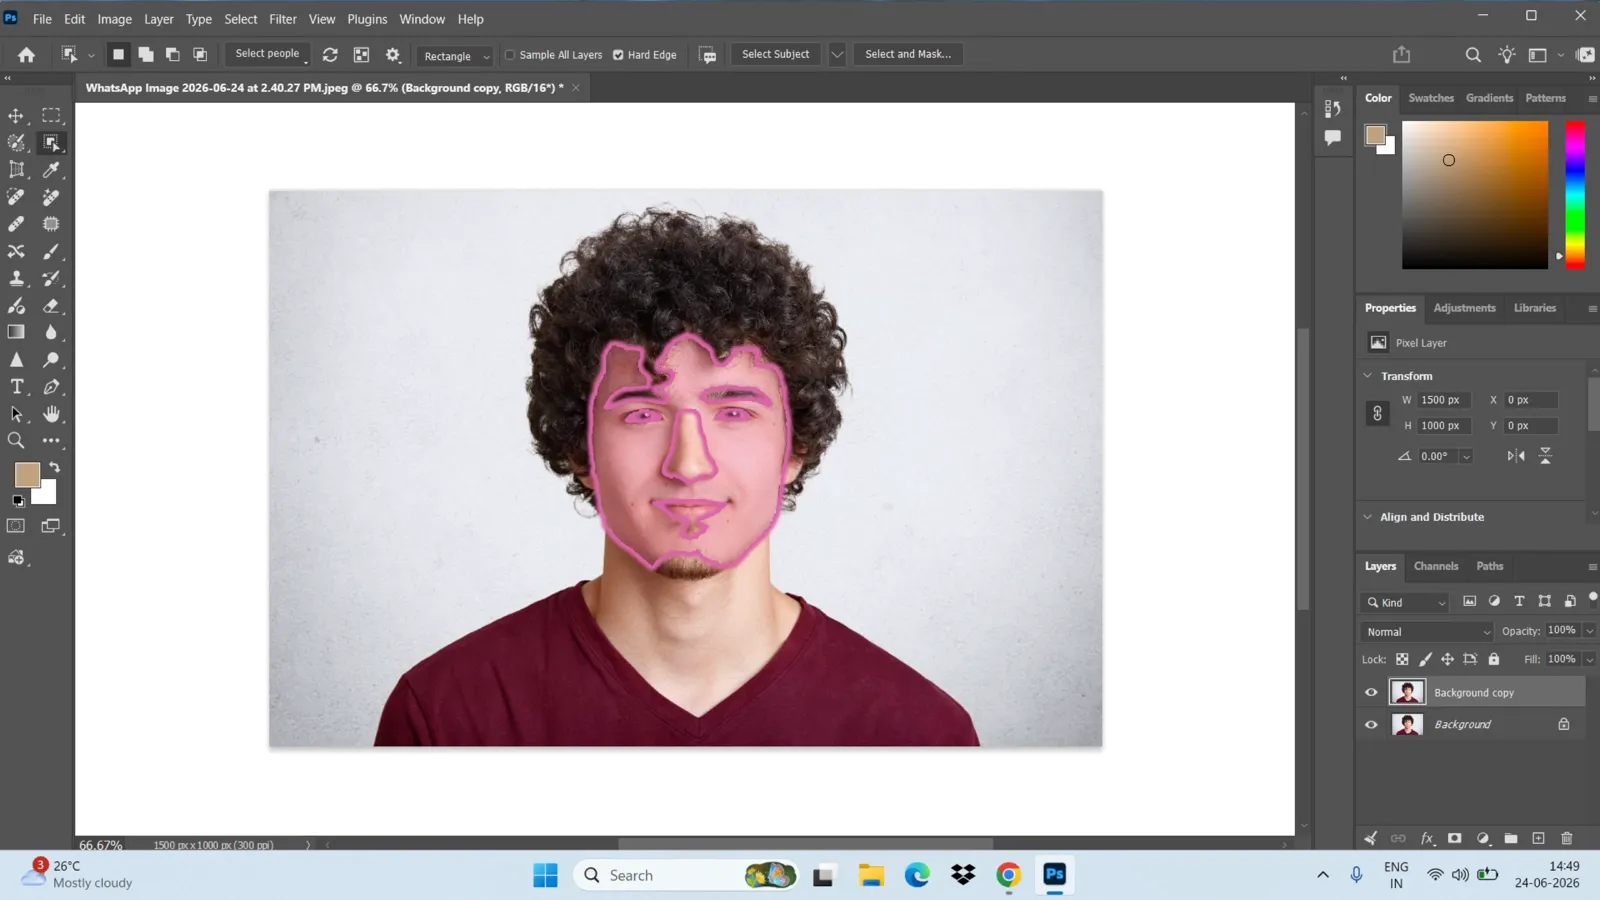
**Step 2: **Select the Object Selection tool, then drag around the face. Switch to the Quick Selection tool if the edges are tricky, or use the Lasso tool to fine-tune the outline by hand.
**Step 3: **Press Ctrl/Cmd+C to copy, then switch to your target photo and press Ctrl/Cmd+V to paste. This drops the face onto its own layer.
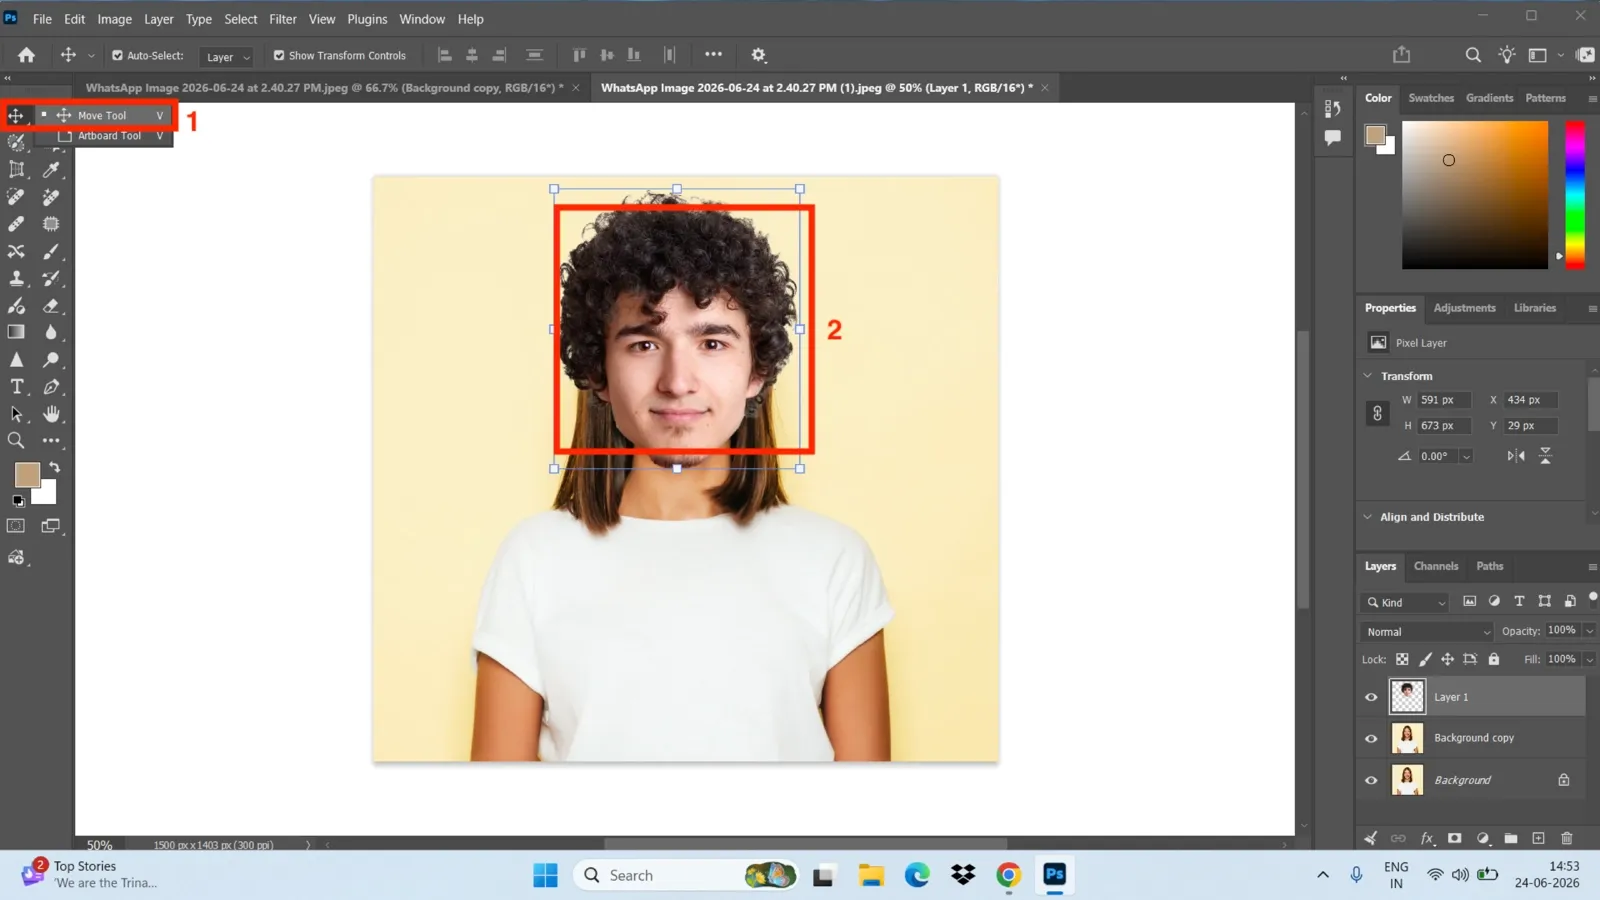
**Step 4: **Select the Move tool, then drag the new face to the original face's position.
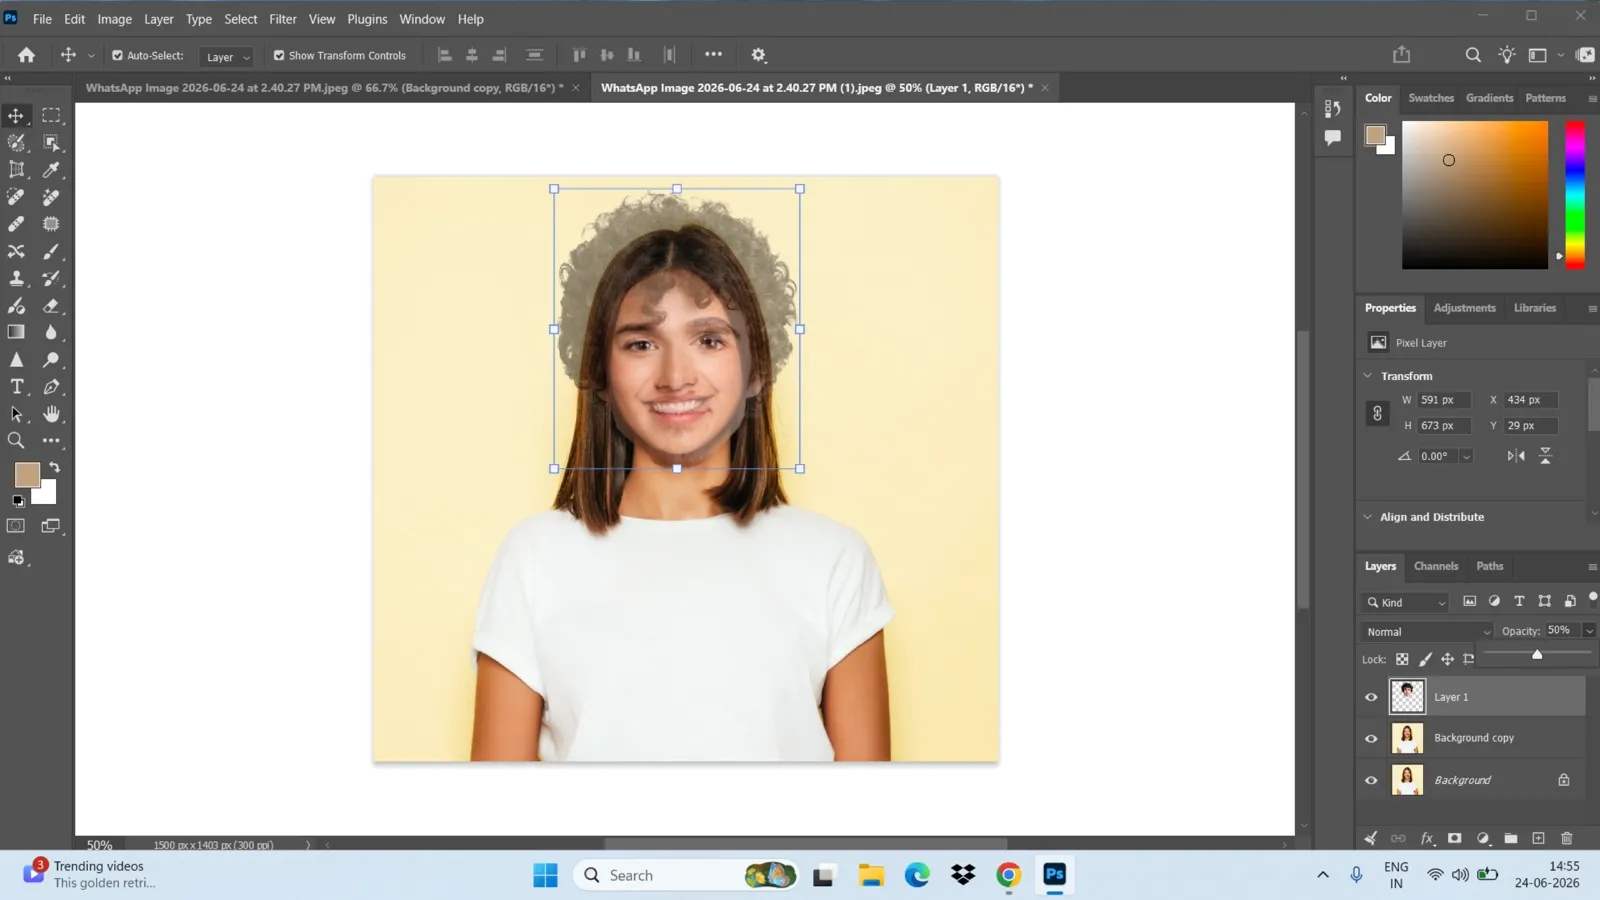
**Step 5: **Lower the new layer's opacity so you can see the face underneath, then press Ctrl/Cmd+T to open Free Transform. Resize and rotate until the eyes, nose, and mouth line up with the photo below.
**Step 6: **Once the features line up, set the layer opacity back to 100%.
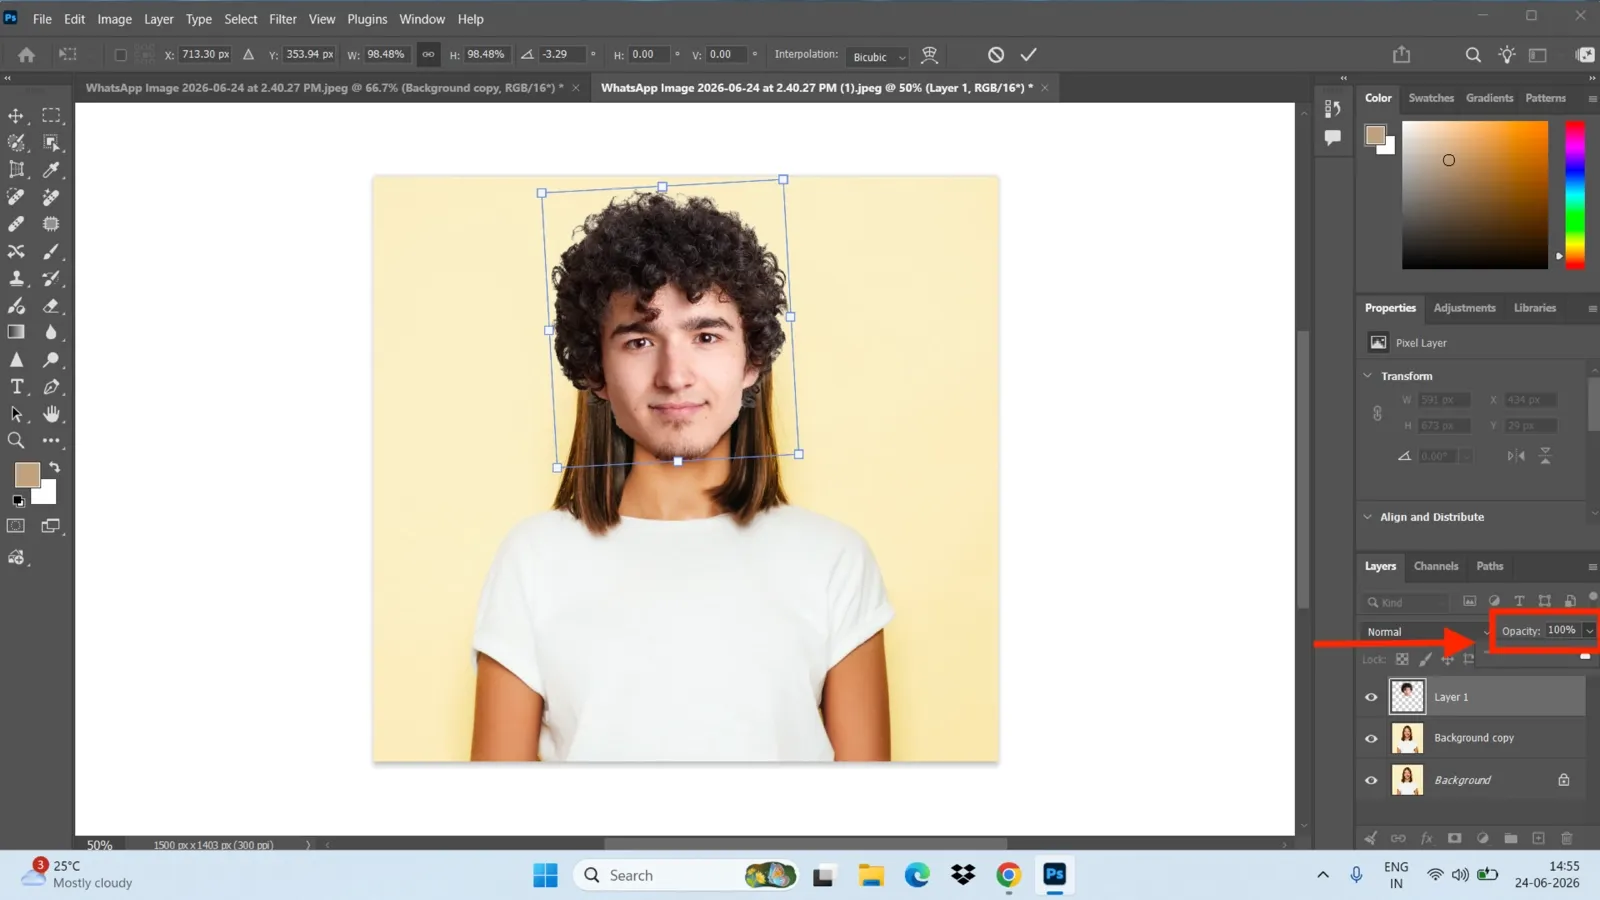
Pick a source face that's a bit larger and higher resolution than the one you're replacing. A small, low-resolution face blurs when scaled up, while a larger one retains its detail when scaled down. This same process works for a full head swap, too. Just select the head rather than just the face, and expect to spend more time blending the hairline and jaw with the body below.
Blend and Color-Match Your Face Swap
A face swap in Photoshop only looks realistic once the skin tone, lighting, and texture match across both layers.
**Step 1: **Select the new face layer, then go to Image > Adjustments > Match Color. Pick the base photo as your source, and Photoshop adjusts the color and tone to match.
**Step 2: **Refine the mask edges using feathering or a slight Gaussian Blur on the layer mask to create a natural transition.
**Step 3: **Select the new face layer and adjust its color and tone to match the base photo. You can use Image > Adjustments > Match Color, or adjustment layers such as Curves, Hue/Saturation, and Color Balance, to blend skin tones.
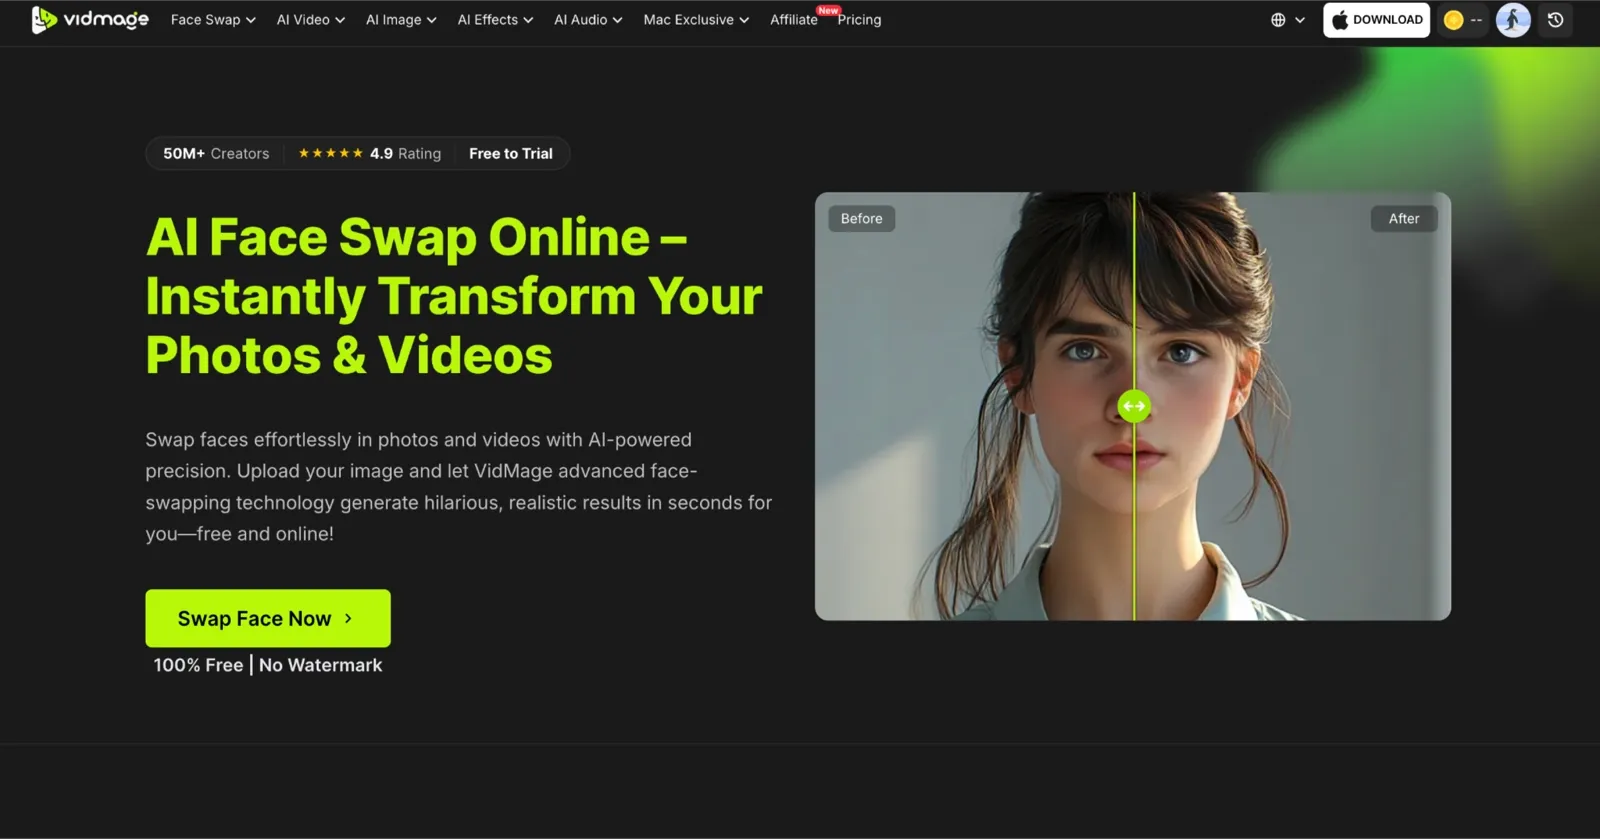
Photoshop gives you precise control over every part of a face swap, but it also requires manual work such as selecting faces, aligning features, creating masks, and matching colors. If you only need a quick face swap for a photo, GIF, or video, an AI face swap tool can automate most of those steps. Tools like VidMage let you upload your files and generate a face swap in a few clicks, without having to work through Photoshop's editing workflow.
Tips for a More Realistic Face Swap
1. Fix Mismatched Skin Tones
When one face is noticeably darker or lighter than the other, Match Color alone may not fully fix it.
Add a Curves adjustment layer above the new face layer and clip it to that layer only. Pull the curve to brighten or darken the face until it matches the skin tone around it.
Add a Hue/Saturation adjustment layer, then nudge the hue toward the warmer or cooler end of the base photo's color range.
Lower the brush opacity to 50%-70% while painting the layer mask. This blends the edge gradually instead of leaving a hard line.
2. Match Different Angles or Lighting
If your two photos show faces at different angles or lit from different directions, a straight copy-and-paste will look off.
Use Free Transform's Warp mode to gently reshape the face. Right-click while in Free Transform and select Warp, then drag the grid to follow the angle of the body underneath.
Check which direction the light falls on each face. If the lighting direction doesn't match, add a Curves or Brightness/Contrast layer to darken or lighten one side.
If the new face leaves a gap along the hairline or jaw after resizing, use Generative Fill to patch the area instead of leaving a visible seam.
FAQs
How do you fix mismatched skin tones when one face is much darker or lighter than the other?
Run Match Color first (Image > Adjustments > Match Color) using the base photo as the source. If the gap is still visible, add a Curves adjustment layer above the new face layer and clip it to that layer only. Pull the curve to brighten or darken the face until it matches the skin tone around it. A Hue/Saturation layer can nudge the hue toward the warmer or cooler end of the base photo's color range. While painting the layer mask, lower the brush opacity to 50%-70%. This blends the edge gradually instead of leaving a hard line.
How do you face-swap when the two faces are at different angles or under different lighting conditions?
Use Free Transform's Warp mode to reshape the face so it follows the body's angle. Right-click while in Free Transform and select Warp, then drag the grid until the features line up naturally. Check which direction the light falls on each face next. If the lighting direction doesn't match, add a Curves or Brightness/Contrast layer to darken or lighten one side. If the new face leaves a gap along the hairline or jaw after resizing, use Generative Fill to patch the area instead of leaving a visible seam.
Why does a face swap look fake, and how do you fix each giveaway?
Face swaps usually look off because of hard edges, mismatched skin tones, different image grain, or visible seams. These can be fixed by softening the mask edges, matching color with Match Color plus Curves/Hue/Saturation, adding slight noise for texture consistency, and refining or filling gaps around the hairline or jaw.
How do Photoshop manual method vs. free AI face swap tools compare on time, cost, and learning curve?
Photoshop offers full manual control, but it takes more time and skill. It costs US$22.99/month (annual plan, billed monthly) and includes a free trial. Each face swap requires steps like masking, alignment, and color correction.
AI tools like VidMage are faster and more automated. It has a free plan with limits (15 image swaps/day, 20s video/day, 2 GIF swaps/day). Paid plans start at $14.99/month (or $9.99 first month) and $8.33/month yearly, with higher credits and fewer restrictions.
How do you swap a face in a video or GIF when Photoshop can't do it well?
If you need to swap a face in a video or GIF, a dedicated AI face swap app saves hours of manual work. VidMage's video and GIF face swap features process every frame automatically, so you upload your clip and get a finished swap in seconds, instead of frame by frame in Photoshop.